Queues help your teams manage leads, cases, service contracts, and custom objects. Records can be placed in a queue manually or through an automatic case or lead assignment rule, and the records will remain there until they’re assigned to a user or taken by one of the queue members. Any queue member or users above them in the role hierarchy can take ownership of the records in a queue. In this article we’ll walk you through the following:
- How to create a lead queue in Salesforce.
- How to add or remove visibility to the queue.
- How to create a Lead Assignment Rule.
- How to send web-to-lead conversions to the lead queue.
- How to send Pardot form completions to the lead queue.
Lead Queues in Salesforce
Lead queues are where you place your unassigned leads for assignment to your sales teams. When adding leads to the queue you’ll have two options, you can either manually add them or use an assignment rule. If you’re using Pardot, you can use a completion action from a form, but we’ll get more into that later. You can create a shared queue of leads. It’s a special type of list view that you can share with users, groups, and roles. When you create a queue it automatically creates a list view in your org. The queue and its list views have visibility settings that allow you to determine who you share them with.
Before You Get Started with Lead Queues
Permissions Needed:
Editions: Classic, Enterprise, Performance, Unlimited, and Developer Editions
Permissions Needed: Create and Change Queues, Customize Application, and Manage Public List Views
Change Lead List View Visibility: Read on leads and create and customize list views
Other:
- You can’t edit list views in Lightning Experience.
- You can set the visibility settings by profiles, roles, or users.
How to build a lead queue in Salesforce (Steps)
- Navigate to Setup, enter ‘Queues’ in the Quick Find box, and then select Queues.
- Click on the ‘New’ button to create a new lead queue.
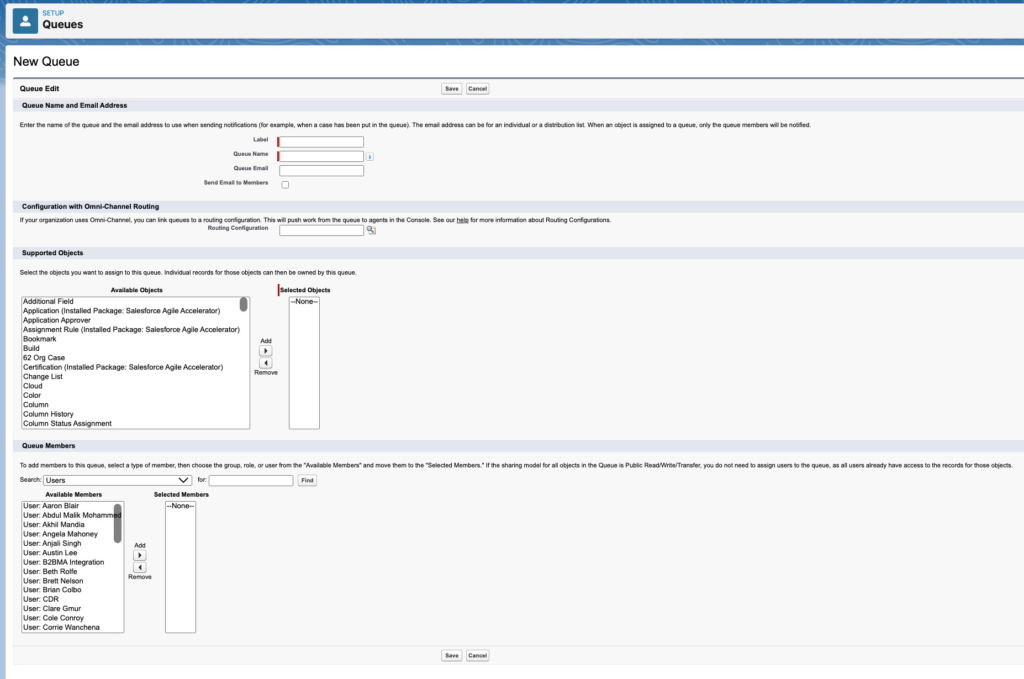
On the queue detail page, under Queue Members, add the users you want to pass leads to. Once you’ve added your queue members, click ‘save’. Upon saving, a list view will be created.
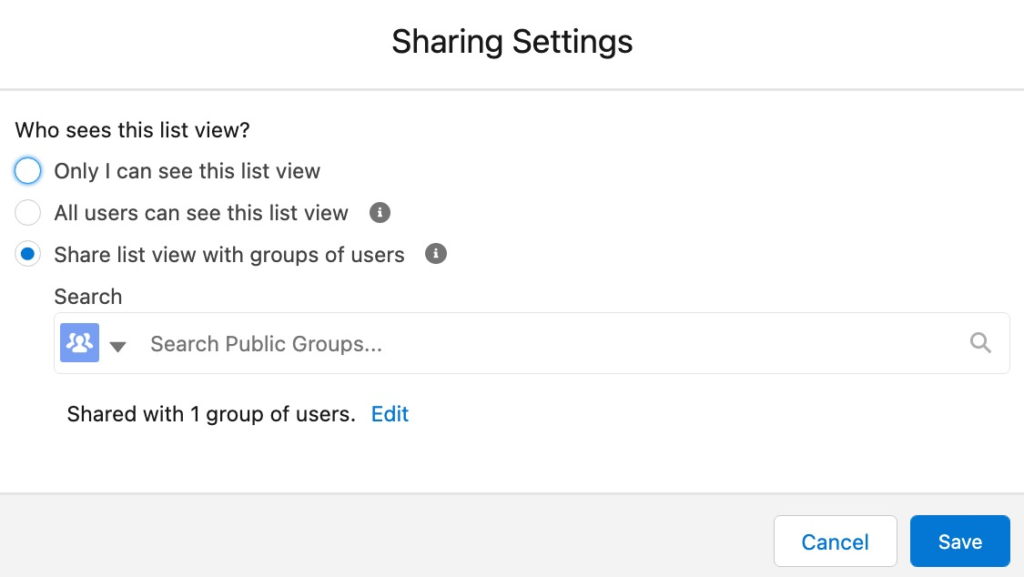
Sharing settings on the list view: To find the list view, navigate over to your lead object, then from your views drop-down list, select the list view with the same name as the queue you just created and edit. Here you’ll want to set your visibility preferences. You can decide where you want to share this list with only yourself, all users, or if you want to share with a specific group of users.
How to Create a Lead Assignment Rule
A lead assignment rule is a set of criteria that can either assign a lead to a specific user or a queue. In this case, we’re going to set up a lead assignment rule to assign leads to a lead queue. Here’s how to set up a lead assignment rule:
- Navigate to Setup, enter ‘Assignment Rule’ in the Quick Find box, and then select ‘Lead Assignment Rules’.
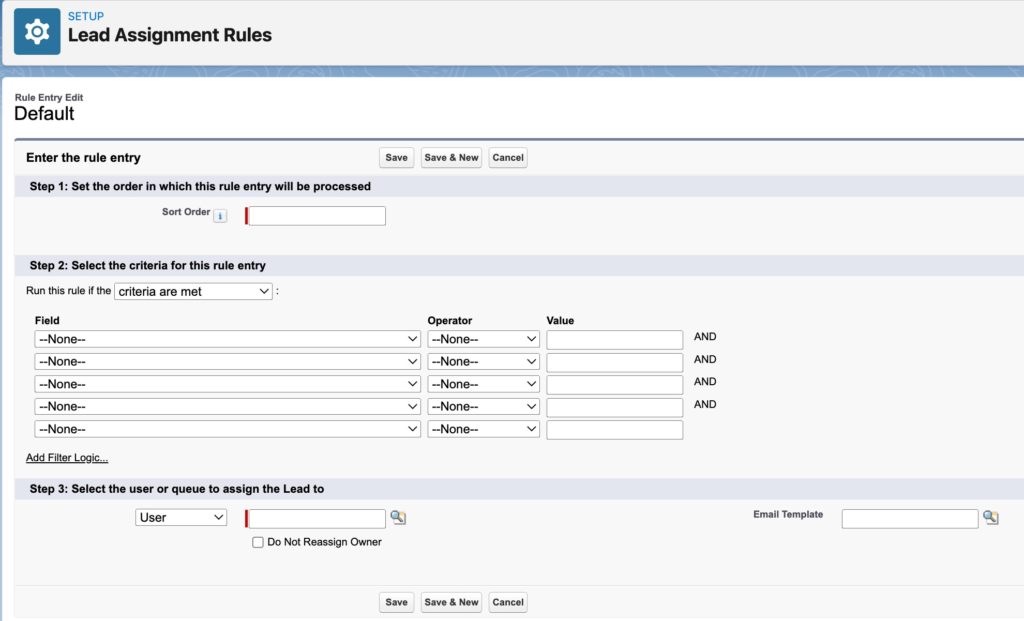
- Click ‘New’ to create a new rule. You’ll see a window like the one below, start by naming your rule.
The Anatomy of the Automation Rule
- Sort Order: This determines the order in which the rule is processed, so this would be numeric 1,2,3, and so on. Salesforce will start with rule 1, if the criteria don’t match it will move onto rule 2, and then 3, and so on. If there is no match then the lead will be assigned based on the default lead owner. We’ll set this up in the next step.
- Criteria: These are the conditions the lead must match in order to be assigned to the lead owner indicated on this specific automation rule. You could use criteria here such as region, company size, or even revenue size.
- User: Finally, you’ll enter the user that you want the lead to be assigned to based on the criteria you set above.
Once you save your automation rule, don’t forget to activate it.
Select a Default Lead Owner
You’ll want to go ahead and set up a default lead owner. If for some reason your lead is not assigned, this setting assigns the lead to a specific person. Here’s how to do it.
- Navigate to Setup, enter ‘Marketing’ in the Quick Find box, and then select ‘Lead Settings’.
- Under the lead queue settings, you’ll search for the user you want to select as your default lead owner, select, and hit save.
How to send web-to-lead form completions to your queue
If you’re capturing web leads via a Salesforce web-to-lead form you’ll likely want to assign those leads using your new lead queue. Here’s how to do it.
- When you create your web to lead form, you can set the value in the “Lead Source’ field with a specific value such as ‘Website’. You’d want this field to be hidden so your users don’t see it.
- When you set up your lead assignment rule, make sure the lead source field is equal to ‘Website’, then those leads will enter into the lead queue.
How to send Pardot form completions to a lead queue
If you’re using Pardot forms on your website and want to add leads to the queue from the form, it’s very straightforward. You’ll need to add a completion action to the form. Select ‘Assign to Queue’ then select your queue.

If you don’t see the queue then you’ll need to connect it from Pardot to Salesforce. Navigate to Pardot Settings > Users > Then on the top right click ‘View Queues’. Here you can add your queue and connect it to Salesforce, which will make it available on the completion action of the form.
We hope this article was helpful for you to learn to create a lead assignment rule and send leads from salesforce and Pardot forms. Feel free to reach out if you have any questions.

Jennifer Contino
Director of Marketing
Jen, our director of marketing comes to us with over a decade of marketing experience and nearly a decade within the Salesforce ecosystem. She’s known for her work with Pardot, creativity within the digital marketing space, and passion for marketing and the power of Pardot and Salesforce together.
About Roycon
We’re an Austin-based Salesforce Consulting Partner, with a passion and belief that the Salesforce platform’s capabilities can help businesses run more efficiently and effectively. Whether you are just getting started with Salesforce or looking to realize its full potential, Roycon specializes in Salesforce Implementations, Salesforce Ongoing Support, and Salesforce Integrations, and Development. We’re the certified partner to guide the way to increase Salesforce Adoption, make strategic decisions, and build your Salesforce Roadmap for success.