Salesforce Communities: How to Share Data Between Accounts Using Account Relationships
Hey there! Are you a Salesforce Community administrator looking for a solution to share data between community user accounts? You are? Perfect! I think I have just what you’re looking for and if you’re thinking of using the External Account Hierarchy as the solution, then that’s a great guess, but it may not be the best answer.
External Account Hierarchies are similar to role hierarchies for internal Salesforce users in that you may take an account within a community and create a parent-child relationship to allow the parent account to see the account information of the child account. However, External Account Hierarchies do not allow parent accounts to see information on other objects and that’s no fun if you need more than the account information.
If you do need more than the account information shared between community user accounts, then we’ll need to take a look at Account Relationships. Account Relationships also have a parent-child relationship, but the relationship is established by the Account Relationship Type Field and the object selected by the administrator that creates the Account Relationship Data Sharing Rule. Well, that may not make much sense without a bit more information and some visuals, so let’s move into how the feature is enabled, how the feature is set up, and some use cases to get you started sharing data between your community members.
Enable: Account Relationships
BEST PRACTICES REMINDER: It is highly recommended that any testing, creating, or enabling be done in a sandbox or non-production environment. This is especially important with either of the aforementioned features – External Account Hierarchies or Account Relationships – as both features can not be disabled once enabled.
REMINDER: You will need to have your Salesforce Community set up in order to test sharing data using Account Relationships.
- Login to the environment where you’ll be testing the feature.
- Select, Setup.
- Type “Digital Experiences” into the Quick Find.
- Select, Settings.
- On the General Settings page, scroll down to Account Relationship Settings.
- Select the checkbox for Enable Account Relationships.
- Select, Save.

Setup: Account Relationship Sharing Rules
After Account Relationships is enabled, the Account Relationship object will become available in the App Launcher and in Setup.
Let’s begin with Setup, as the Account Relationship Type is necessary for establishing Account Relationships in the App Launcher.
- Go to Setup.
- Type “Account Relationship” into the Quick Find.
- Select, “Account Relationship Data Sharing Rule Settings”
- Select, the “New” Button to open the New Account Relationship Data Sharing Rule Screen

Referring to the above screen, there are several required fields that are fairly easy to complete. Let’s go over each required and recommended field from top to bottom.
Rule Information
- Name: The title of the Account Relationship Sharing Rule.
- Naming conventions will vary by org and by user, but I prefer to keep it simple. So, my Account Relationship Sharing Rule names are usually some form of the word share and the object that is being shared. (e.g. Sharing Accounts, Sharing Opportunities, Sharing Cases, etc.)
- Developer Name: The API title of the Account Relationship Sharing Rule.
- As with other API titles (names) there should not be any spaces. So, copying and pasting the name then deleting any spaces would be recommended to keep things uniform and easier to maintain.
- Description: The field to record any notes regarding the use or purpose of the Account Relationship Sharing Rule.
- Descriptions are always recommended.
Rule Details
- Account Relationship Type: The field that drives the Account Relationship Sharing Rule. After completing the Account Relationship Sharing Rule in Setup, admins will be able to designate Account Relationships in the App Launcher by selecting the Account Relationship Type.
- The default picklist values for the Account Relationship Type field are: Advertiser, Agent, Agency , Broker, Client, Consultant, Contractor, Dealer, Developer, Distributor, Institution, Lender , Retailer, Sub Contractor, Supplier, System Integrator, VAR/Reseller, Vendor.
- These fields have their use cases which will vary from org to org and from user to user, but they don’t jump out as very useful to me, especially when other admins/users will have to follow along later on. In general, I prefer to create picklist values for the Account Relationship Type that specify the object that I’m sharing and to what extent I’m sharing that object – Read or Write. More on custom picklist values below.
- The default picklist values for the Account Relationship Type field are: Advertiser, Agent, Agency , Broker, Client, Consultant, Contractor, Dealer, Developer, Distributor, Institution, Lender , Retailer, Sub Contractor, Supplier, System Integrator, VAR/Reseller, Vendor.
- Access Level: The field that controls to what extent the shared object can be altered – Read Only or Read/Write.
- Access levels will vary and change on a case by case basis, but less is typically more, so start with Read Only and increase access as needed.
- Object Type: The field (lookup) that establishes which object is to be shared by the Account Relationship Sharing Rule.
- The objects available are limited to view. In order to see additional objects type the name of the object into the lookup field.
Advanced Formula
- Static Formula Criteria: This section is used to further specify how the object is shared, but it is not required.
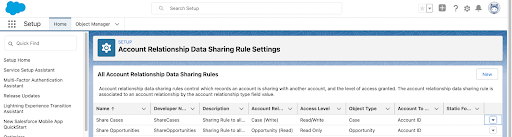
Let’s take a look at two examples of Account Relationship Sharing Rules just before saving – Share Opportunities and Share Cases. (Take note of the custom picklist values in the Account Relationship Type field. I believe these values are more readable and easier to understand.):


And here’s a look at the Account Relationship Sharing Rule after they’ve been saved:
With those two sharing rules created, we’re now ready to move to the App Launcher and create the Account Relationship which specifies the account that will have access according to the previously made Account Relationship Sharing Rule.
Setup: Account Relationships
- Select the App Launcher
- In the Quick Find, type “Account Relationships”
- Select, Account Relationships
- Once on the Account Relationships Screen, Select the “New” Button
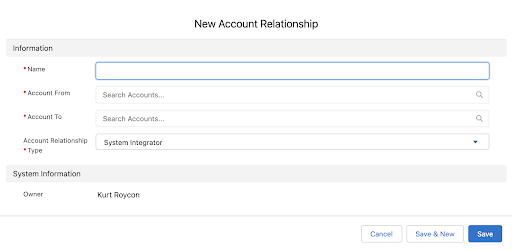
Information
- Name: The title of the Account Relationship.
- As mentioned before, clarity in naming conventions will be very helpful for future admins and as the number of Account Relationships grow.
- Account From: The account that will be allowed access to the data of another account.
- Account To: The account’s data that will be shared.
- Account Relationship: The picklist value established in the Account Relationship Sharing Rule. (NOTE: System Integrator is the current default.)
SIDEBAR: I find the naming of the Account From and Account To fields to be a bit confusing, as I read it as data is going from said account to said account, but that is incorrect. Of course, repetition will help, but you may also look at it from the position of the fields on the page. The higher field (Account From) can see the lower field’s (Account To’s) data.
System Information
- Owner: An automated field based on the current user.
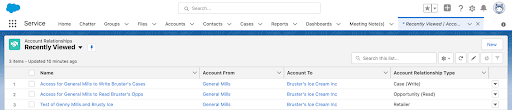
Take a quick look at the screen below for Account Relationships created in the App Launcher with the first two using easy to understand naming conventions and custom picklist values, while the third uses a less helpful naming conventions and a default picklist value:
Uses: Account Relationships
Now that we know what an Account Relationship is, how it differs from an External Account Hierarchy, how to set up an Account Relationship Sharing Rule, and how to create an Account Relationship, let’s briefly go over some use cases for Account Relationships.
- Acquisitions/Mergers: Companies (Accounts) that purchase or merge with other companies (Accounts) within your Salesforce Community.
- This was the use case that prompted my research on sharing rules within a community. A client of ours has clients that have acquired other companies (Accounts), but do not want to merge the companies externally or internally. However, access to each account’s records will be needed by the different Salesforce Community users.
- Auditors: Companies (Accounts) that may be acting as an auditor of your company/organization or that may be an auditor within your industry.
- This use case is one that came to mind for future projects that may have outside parties in need of accessing data. There very well may be a better alternative, but Account Relationships may be an option for providing auditors access to data without exhausting a Salesforce User License.
- Distributors/Retailers: Companies that would like clients or prospective clients to access their services and/or products to stimulate or maintain sales.
- Another use case that came to mind for future projects that may require one or many accounts within your Salesforce Community accessing data related to available products or services from your organization or another account.
In Closing
Salesforce has its many uses and can be quite the asset if you know where to find the resources and tools that you need. With a bit of experience, you’ll come to know what Salesforce is capable of and subsequently, you’ll be able to extrapolate what it’s likely able to do. In my case, sharing data between Salesforce Community accounts was something that I knew Salesforce could do, but which tool was the best for my use case was the tricky part. Now I know and hopefully this quick overview of Account Relationships will add another tool to your toolbox and make it all the quicker for you to tackle sharing data between your Salesforce Community accounts.
If you need help you can always contact us. You can learn more about us, we’re an Austin-based Salesforce Consulting partner, with a passion and belief that the Salesforce platform’s capabilities can help businesses run more efficiently and effectively. Thanks for stopping by the Roycon Salesforce blog, be sure to subscribe. Thanks for reading and as always, happy building!