Hello, and welcome to the Roycon Blog! Today we are going to be discussing how to leverage Field Service App Extensions to integrate with the popular payment processing application, Square. If you are interested in learning more about the functionality afforded by Field Service, you can check out our previous blog posts, Salesforce Field Service: From pen and paper to digitally empowered service and Salesforce Field Service Lightning: Top 5 Features.
Being able to integrate directly with Square using out-of-the-box Field Service Lightning functionality allows small businesses to scale their operations by utilizing Salesforce, the #1 CRM Solution, along with the best-rated Point of Sale (POS) System for Small businesses according to Business News Daily.
Prerequisites
- Salesforce licensing, including at least one (1) Service Cloud user license
- Field Service licensing, including FSL Mobile App
- Square Payments Developer account (sign up here)
- iPad or iPhone with a data connection
- Square Swipe Reader with USB-C to headphone jack dongle or Bluetooth enabled Square Dip Reader
Overview
This integration will allow Field Service Technicians to accept credit card payments from a customer while in the field, allowing Salesforce to capture the payment information and tie it to a Field Service WorkOrder record via a master-detail relationship on a Payment__c object. We will also add error logging that will register a Payment_Error__c record in the event that Square payment processing is unsuccessful.
We will be building a WorkOrder trigger that populates a custom field called Launch_Value__c that will be used within our FSL App Extension to open the Square payment processing app, followed by a REST API endpoint that will allow us to receive information from Square. Due to functional limitations within the Square Point of Sale (POS) API at the time of this writing, we will then call out to Square to get the Square Order record information, from which we will populate our Payment__c object record within Salesforce. Simple enough, right? Let’s get started!
These are the steps we’re going to take to integrate Field Service Lightning with Square Payment Processing:
1 – Creation of the Payment__c Object
2 – Creation of the Payment_Error__c Object
3 – Creation of the WorkOrder.Launch_Value__c field
4 – Creation of a Force.com Site to act as our Callback URL
5- Create Trigger Handler to populate WorkOrder.Launch_Value__c
6 – Create Field Service Mobile App Extension
7 – Create a @RestResource class that maps the JSON response from Square to Salesforce fields
8 – Create an HTTP Callout to Square to retrieve the Salesforce WorkOrder.Id that was sent over in our Launch Value
9- Create Remote Site Setting for Square
10 – Create Square Webhook Subscriptions
11 – Set Callback URL
12 – Pulling it all together
Step One - Creation of the Payment__c Object
Step One – Creation of the Payment__c Object
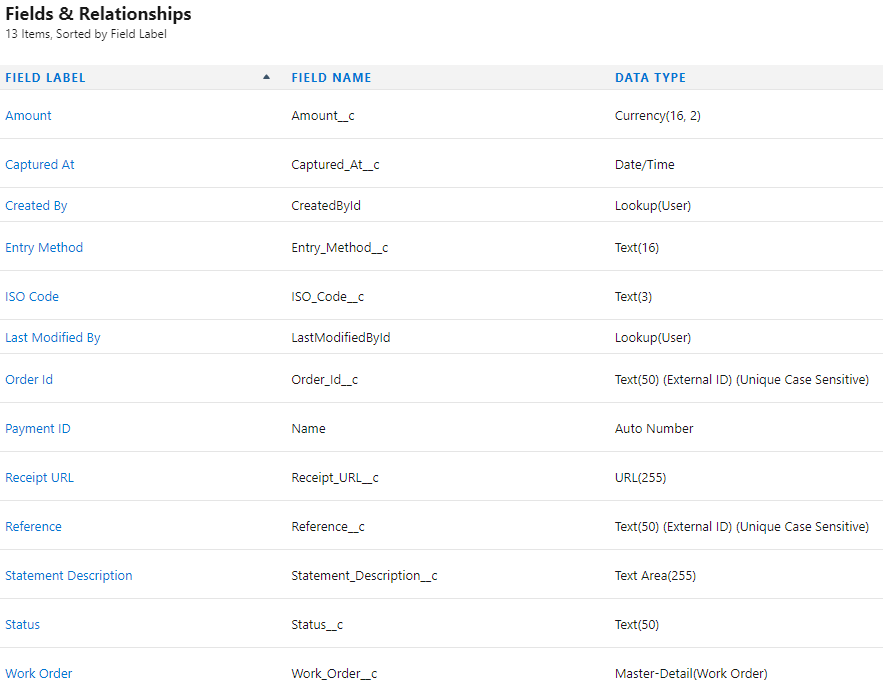
First, we must create the Payment__c object. The custom fields recommended are:
| Field Label | Field Name | Data Type | Square Mapping |
| Amount | Amount__c | Currency(16,2) | amount |
| Captured At | Captured_At__c | Date/Time | captured_at |
| Entry Method | Entry_Method__c | Text(16) | entry_method |
| ISO Code | ISO_Code__c | Text(3) | currency |
| Order Id | Order_Id__c | Text(50)(External ID)(Unique Case Sensitive) | order_id |
| Payment Id | Name | Auto Number | — |
| Receipt URL | Receipt_URL__c | URL(255) | receipt_url |
| Reference | Reference__c | Text(50)(External ID)(Unique Case Sensitive) | id |
| Statement Description | Statement_Description__c | Text Area(255) | statement_description |
| Status | Status__c | Text(50) | status |
| Work Order | Work_Order__c | Master-Detail(Work Order) | — |
Step Two - Creation of the Payment_Error__c Object
Step Two – Creation of the Payment_Error__c Object
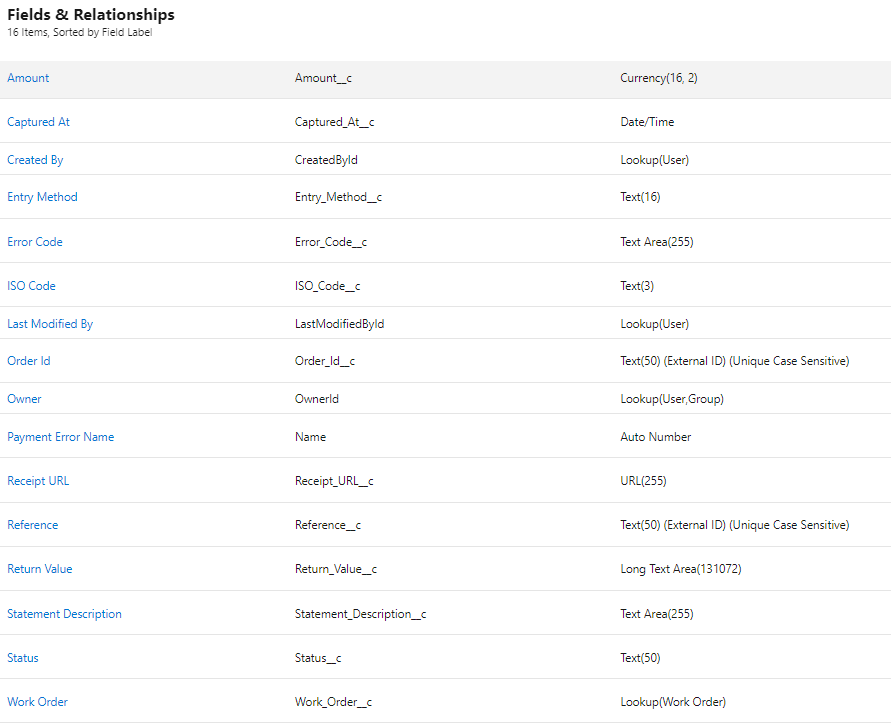
| Field Label | Field Name | Data Type | Square Mapping |
| Amount | Amount__c | Currency(16,2) | amount |
| Captured At | Captured_At__c | Date/Time | captured_at |
| Entry Method | Entry_Method__c | Text(16) | entry_method |
| Error Code | Error_Code__c | Text Area(255) | — |
| ISO Code | ISO_Code__c | Text(3) | currency |
| Order Id | Order_Id__c | Text(50)(External ID)(Unique Case Sensitive) | order_id |
| Payment Error Name | Name | Auto Number | — |
| Receipt URL | Receipt_URL__c | URL(255) | receipt_url |
| Reference | Reference__c | Text(50)(External ID)(Unique Case Sensitive) | id |
| Return Value | Return_Value__c | Long Text Area(131072) | data |
| Statement Description | Statement_Description__c | Text Area(255) | statement_description |
| Status | Status__c | Text(50) | status |
| Work Order | Work_Order__c | Lookup(Work Order) | — |
Some notable differences in the construction of these objects are that the Work_Order__c fields are a Master-Detail relationship on the Payment__c object, and a Lookup relationship on the Payment_Error__c object, respectively. The reason for this is that if Square doesn’t send back any information when we call out, we want to be able to log the payment for record-keeping purposes, as we can manually associate a Payment_Error__c record with the appropriate WorkOrder object record if needed.
Step Three - Creation of the WorkOrder.Launch_Value__c field
Step Three – Creation of the WorkOrder.Launch_Value__c field
| Field Label | Field Name | Data Type | Square Mapping |
| Launch Value | Launch_Value__c | Long Text Area(131072) | — |
Create the Launch_Value__c field on the WorkOrder object. We will need to populate this value by a trigger so that we can use it to launch our Square app on our mobile device properly. More on that in a minute!
We will populate the fields as follows:
- Type:
iOS - Launch Value:
square-commerce-v1://payment/create?data={!Launch_Value__c}where{!Launch_Value__c}pulls directly from theWorkOrderthat the action is launched from - Installation URL:
https://squareup.com/us/en/app(this will redirect users to install the Square app if they do not have it installed on their mobile device) - Label:
Generate Payment - Name:
Generate Payment - Scoped To Object Types:
WorkOrder
The Launch Value will automatically be URL-encoded, so we don’t have to worry about URL-encoding our JSON in WorkOrder.Launch_Value__c.
Step Four - Creation of a Force.com Site to act as our Callback URL
Step Four – Creation of a Force.com Site to act as our Callback URL
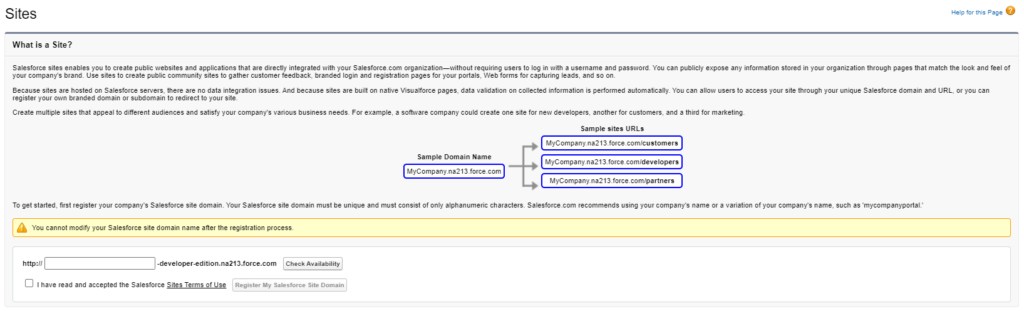
Once we have decided on our Site name, we will create a new Site called “Square”:
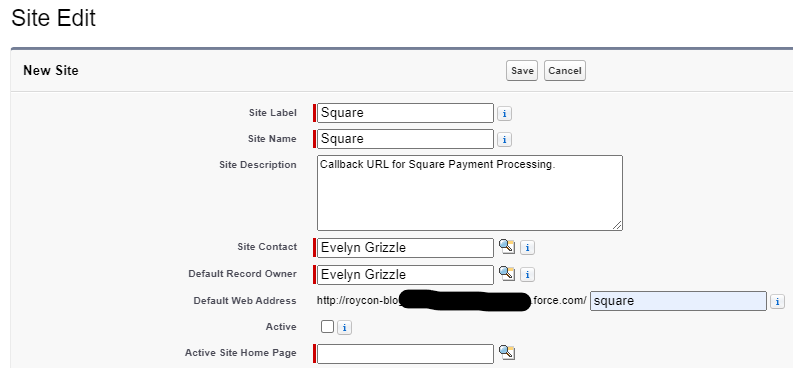
As a temporary measure, we can set our Active Site Home Page to any VisualForce page. In order to simply redirect the user to Field Service Lightning, the following simple VFP can be used:
<apex:page>
<apex:pageBlock>
<div style=”text-align:center;font-size:25px;”>
<a href=”com.salesforce.fieldservice://v1/sObject/”>Return to Field Service Lightning.</a>
</div>
</apex:pageBlock>
</apex:page>
Step Five - Create Trigger Handler to populate WorkOrder.Launch_Value__c
Step Five – Create Trigger Handler to populate WorkOrder.Launch_Value__c
Per the Square Documentation, the Launch Value must be in the format of a JSON string that looks similar to the following:
{
amount_money: {
amount: “500”,
currency_code: “USD”
},// Replace this value with your application’s callback URL
callback_url: “https://www.example.com”,// Replace this value with your application’s ID
client_id: “MY_APPLICATION_ID”,version: “1.3”,
notes: “notes for the transaction”,
options: {
supported_tender_types: [“CREDIT_CARD”,”CASH”,”OTHER”,”SQUARE_GIFT_CARD”,”CARD_ON_FILE”]
}
}
We will create our own JSON string in the Launch_Value__c field and populate it with a trigger. We are populating this with a trigger due to the current limitations of Field Service Lightning, which do currently not allow formulas to be calculated on the Details tab. We want our payment generation to occur based on the value in the Total Price field on the Work Order record. The trigger handler will look something like this:
public with sharing class WorkOrder_TriggerHandler {
private static Boolean runningInASandbox() {
return [
SELECT
Id,IsSandbox
FROM
Organization
LIMIT
1
].IsSandbox;
}public static String callbackURL = runningInASandbox() ? ‘www.SANDBOX_CALLBACK_URL.com/square’ : ‘www.PRODUCTION_CALLBACK_URL.com/square’;
public static String clientID = ‘SQUARE_APPLICATION_ID’;
public static String squareVersion = ‘1.3’;public static void recordInserts_After(List<WorkOrder> newList){
List<WorkOrder> newWorkOrders = [
SELECT
Id
FROM
WorkOrder
WHERE
Id
IN
:newList
];List<WorkOrder> workOrdersToUpd = new List<WorkOrder>();
for(WorkOrder newWkOrd : newWorkOrders) {
//set amount to 0 so that we are not accidentally charging customers when there are no work order line items
String dataParameter = ‘{“amount_money”: {“amount”: 0, “currency_code”: “USD”}, “reference_id”:”‘ + newWkOrd.Id + ‘”, “callback_url”: “‘ + callbackURL + ‘”, “client_id”: “‘ + clientID + ‘”, “version”: “‘ + squareVersion + ‘”, “note”: “‘ + newWkOrd.Id + ‘”, “notes”:”‘ + newWkOrd.Id + ‘”, “options”: {“supported_tender_types”: [“CREDIT_CARD”],”clear_default_fees”:true,”auto_return”:true,”skip_receipt”:true}}’;
newWkOrd.Launch_Value__c = dataParameter;
workOrdersToUpd.add(newWkOrd);
}update workOrdersToUpd;
}public static void recordUpdates_Before(Map<Id,WorkOrder> newMap, Map<Id,WorkOrder> oldMap){
for(WorkOrder newWkOrd : newMap.values()) {
WorkOrder oldWkOrd = oldmap.get(newWkOrd.Id);if(newWkOrd.TotalPrice != oldWkOrd.TotalPrice) {
String dataParameter = ”;
if(newWkOrd.TotalPrice == 0) {
dataParameter += ‘{“amount_money”: {“amount”: 0, “currency_code”: “USD” }, “callback_url”: “‘ + callbackURL + ‘”, “, “reference_id”:”‘ + newWkOrd.Id + ‘”, “client_id”: “‘ + clientID + ‘”, “version”: “‘ + squareVersion + ‘”, “note”: “‘ + newWkOrd.Id + ‘”, “notes”:”‘ + newWkOrd.Id + ‘”, “options”: {“supported_tender_types”: [“CREDIT_CARD”],”clear_default_fees”:true,”auto_return”:true,”skip_receipt”:true}}’;
} else {
Integer totalPrice = (Integer) (newWkOrd.TotalPrice * 100); //the amount is in denominations of $.01 (one cent), so we must multiply our total price by 100
String totalPriceString = String.valueOf(totalPrice);
dataParameter += ‘{“amount_money”: {“amount”: ‘ + totalPriceString + ‘, “currency_code”: “USD” }, “callback_url”: “‘ + callbackURL + ‘”, “reference_id”:”‘ + newWkOrd.Id + ‘”, “client_id”: “‘ + clientID + ‘”, “version”: “‘ + squareVersion + ‘”, “note”: “‘ + newWkOrd.Id + ‘”, “notes”:”‘ + newWkOrd.Id + ‘”, “options”: {“supported_tender_types”: [“CREDIT_CARD”],”clear_default_fees”:true,”auto_return”:true,”skip_receipt”:true}}’;
}
newWkOrd.Launch_Value__c = dataParameter;
}
}
}
}
This Launch_Value__c field value will be appended to the deeplink into Square in our FSL Mobile App Extension.
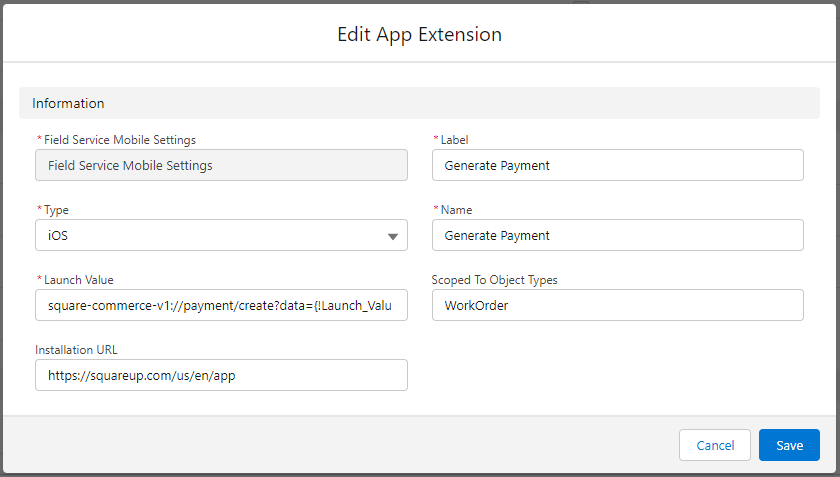
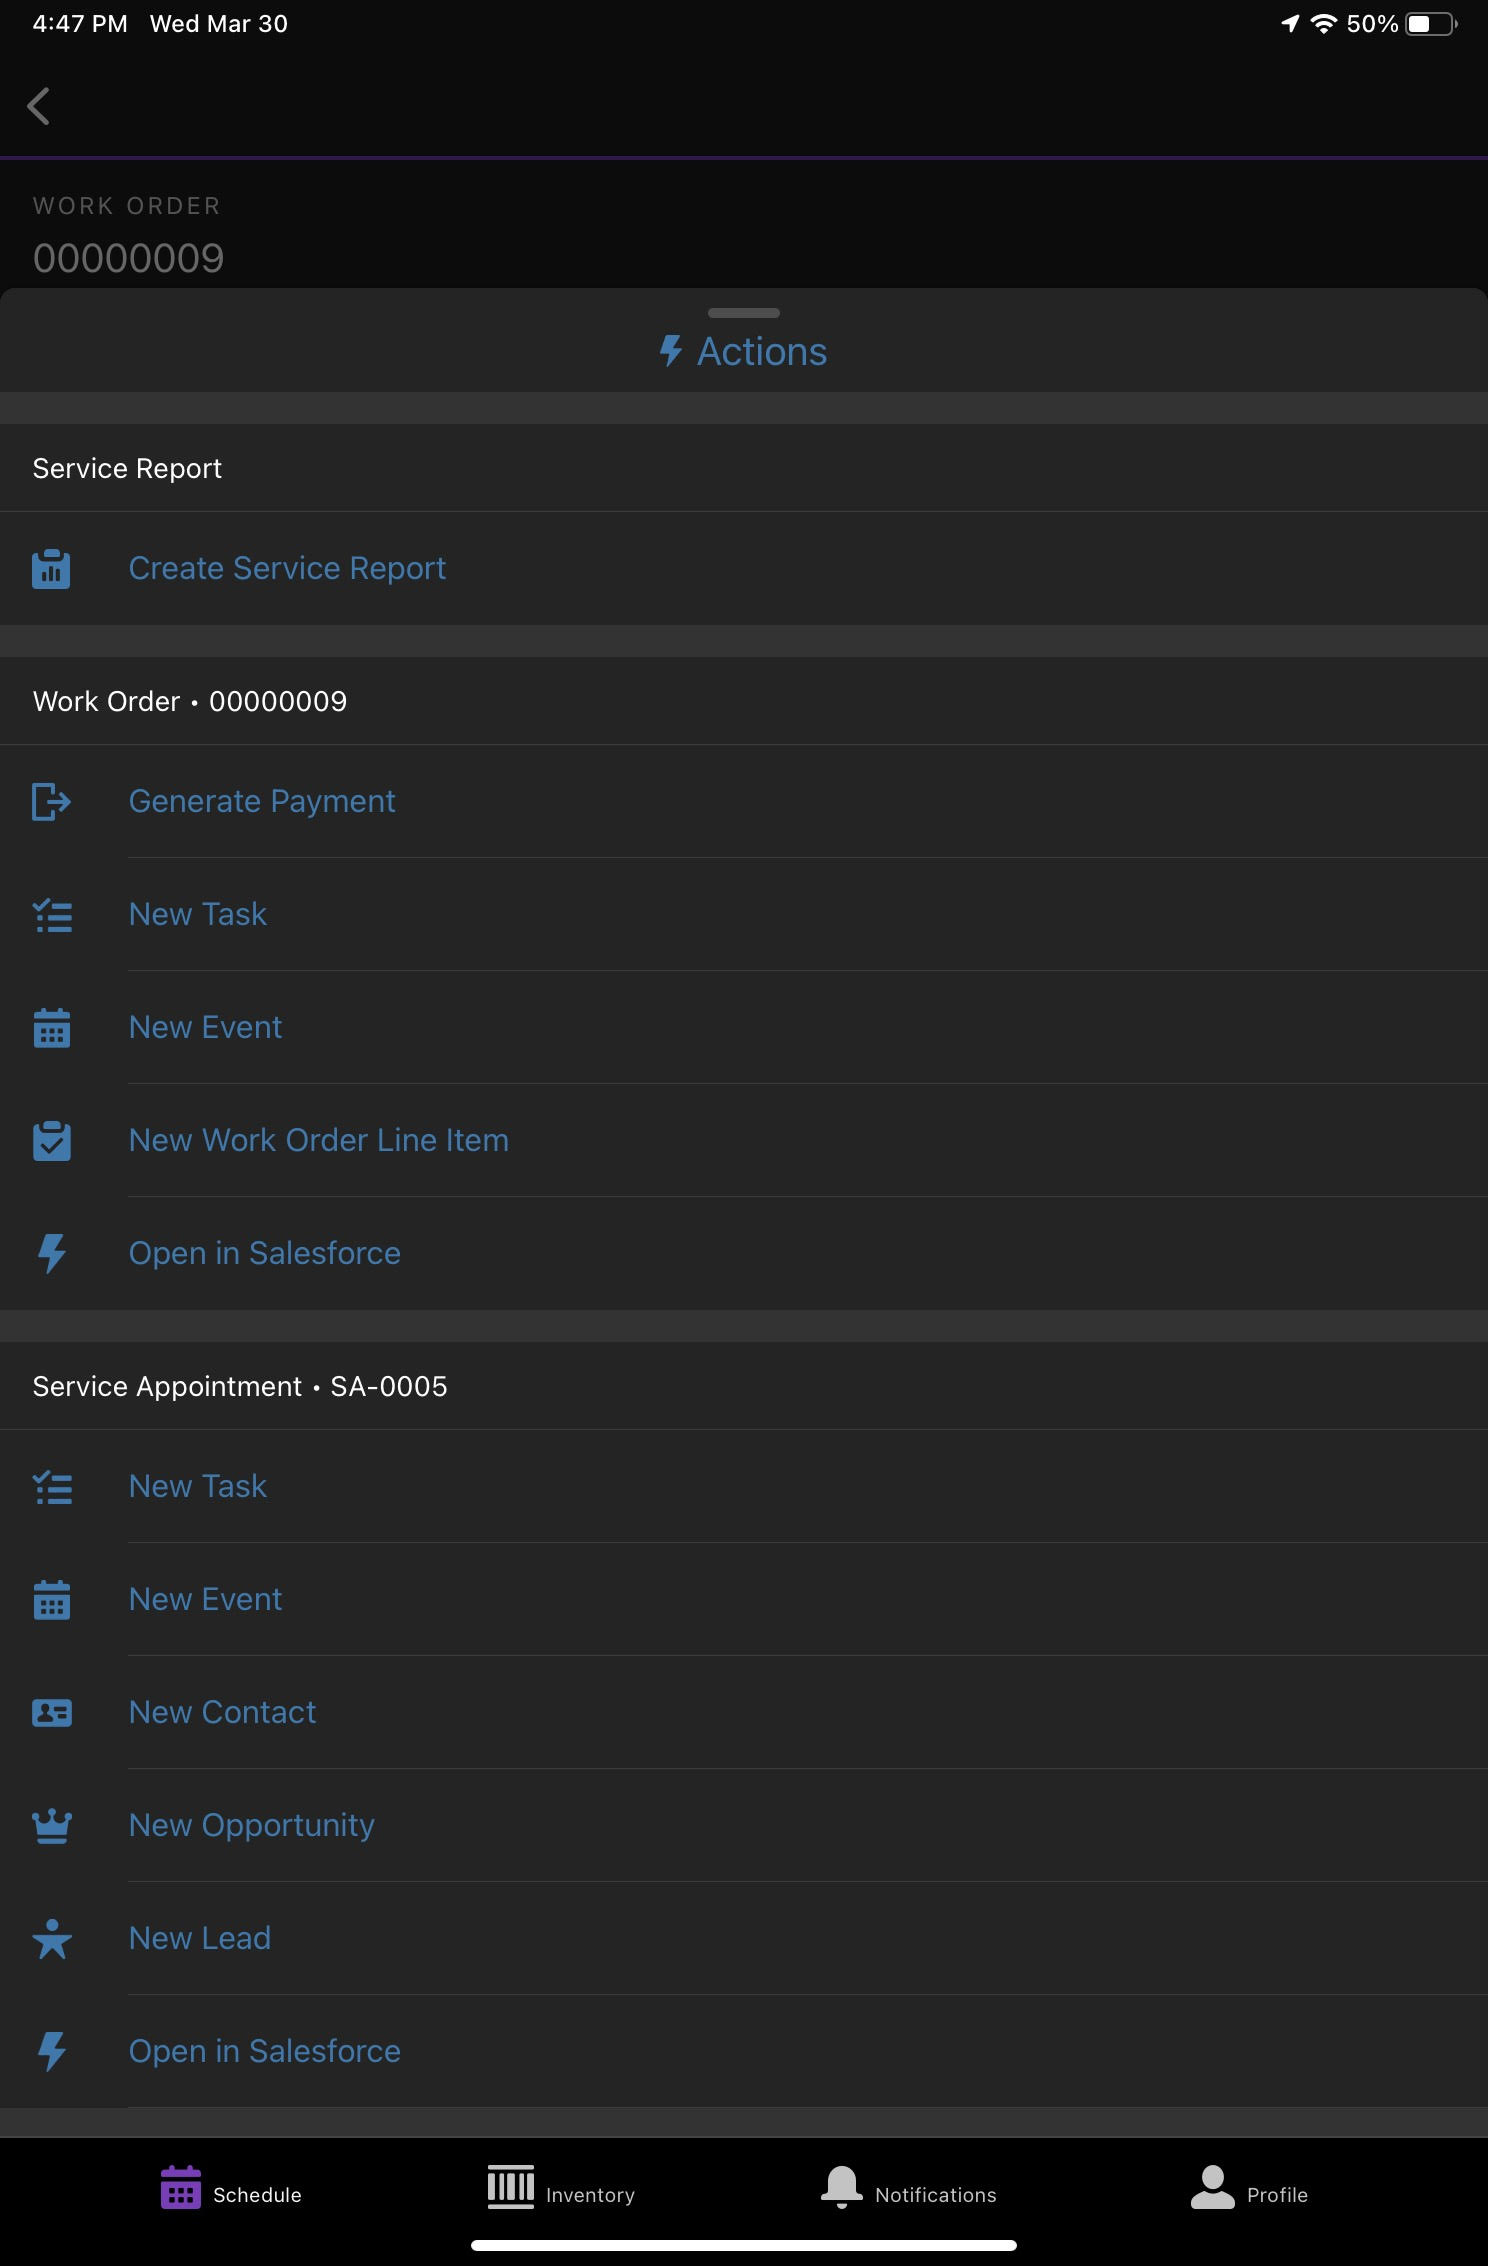
Step Six - Create Field Service Mobile App Extension
Step Six – Create Field Service Mobile App Extension
In the Salesforce Setup Quick Find search, search for “Field Service Mobile,” and select “Field Service Mobile Settings.” Select the drop-down menu on the right hand of the screen, and click “Show Details.”
At the bottom of the page, there will be a section for App Extensions. Create a new App Extension by selecting the “New” button.
We will populate the fields as follows:
- Type:
iOS - Launch Value:
square-commerce-v1://payment/create?data={!Launch_Value__c}where{!Launch_Value__c}pulls directly from theWorkOrderthat the action is launched from - Installation URL:
https://squareup.com/us/en/app(this will redirect users to install the Square app if they do not have it installed on their mobile device) - Label:
Generate Payment - Name:
Generate Payment - Scoped To Object Types:
WorkOrder
The Launch Value will automatically be URL-encoded, so we don’t have to worry about URL-encoding our JSON in WorkOrder.Launch_Value__c.
Step Seven - Create a @RestResource class that maps the JSON response from Square to Salesforce fields
Step Seven – Create a @RestResource class that maps the JSON response from Square to Salesforce fields
This @RestResource class will act as an endpoint for our Square Payment webhooks, which we will create momentarily. The webhooks will send a JSON response via a POST request. The @RestResource urlMapping that we used was 'Payment__c/SquarePaymentManager' for ease of understanding.
This class will create our Payment__c or Payment_Error__c object.
It is important to note that the webhooks sent by Square are sent several times, and will cause duplicate entry errors if there is not a query to verify if the Reference__c Reference Id already exists within the Salesforce organization.
Step Eight - Create an HTTP Callout to Square to retrieve the Salesforce WorkOrder.Id that was sent over in our Launch Value
Step Eight – Create an HTTP Callout to Square to retrieve the Salesforce WorkOrder.Id that was sent over in our Launch Value
It is important to note that, as of the writing of this blog post, Square does not return any information that is sent into the Mobile Web Point of Sale (POS) API. Instead, we must send a GET request on the Square Order object.
The HTTP callout method will look something like this, where responseParameters is a series of wrapper classes that allow us to easily parse the JSON response from Square.
public static responseParameters getOrder(String orderId) {
Http http = new Http();
HttpRequest request = new HttpRequest();
request.setEndpoint(‘https://connect.squareup.com/v2/orders/’ + orderId);
request.setMethod(‘GET’);String squareVersion = ‘2022-02-16’;
String accessToken = ‘ACCESS_TOKEN’;
String contentType = ‘application/json’;String authorizationHeader = ‘Bearer ‘ + accessToken;
request.setHeader(‘Authorization’, authorizationHeader);
request.setHeader(‘Square-Version’, squareVersion);
request.setHeader(‘Content-Type’, contentType);HttpResponse response = http.send(request);
if(response.getStatusCode() == 200) {
//replace currency with curr as currency is a reserved word
responseParameters responseParams = (responseParameters)JSON.deserialize(response.getBody().replace(‘currency’, ‘curr’), responseParameters.Class);
return responseParams;
}return null;
}
This callout can be referenced within the @RestResource that we just wrote, so that the WorkOrder.Id can be assigned to a Payment__c record, thereby allowing it to be the Detail record in a Master-Detail relationship with the parent WorkOrder object record.
This method can be called in our @RestResource class, and the wrapper classes parsed to get the WorkOrder.Id field that we need to associate the Payment__c record with a WorkOrder record.
Step Nine - Create Remote Site Setting for Square
Step Nine – Create Remote Site Setting for Square
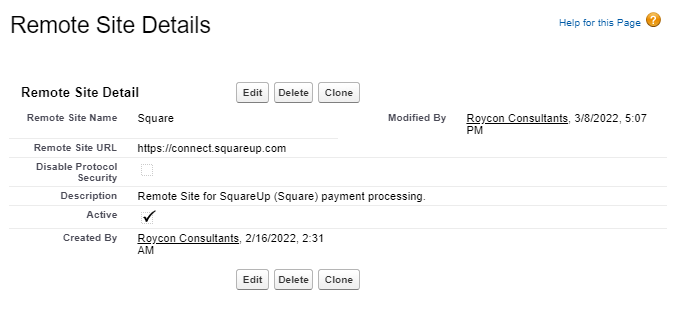
In order to receive information from square to our @RestResource, we must create a Remote Site Setting for https://connect.squareup.com. It is important to note that the Point of Sale API does not (as of this writing) have Sandbox functionality in Square, so the Remote Site Setting will be the same in Production and Sandbox orgs.
Step Ten - Create Square Webhook Subscriptions
Step Ten – Create Square Webhook Subscriptions
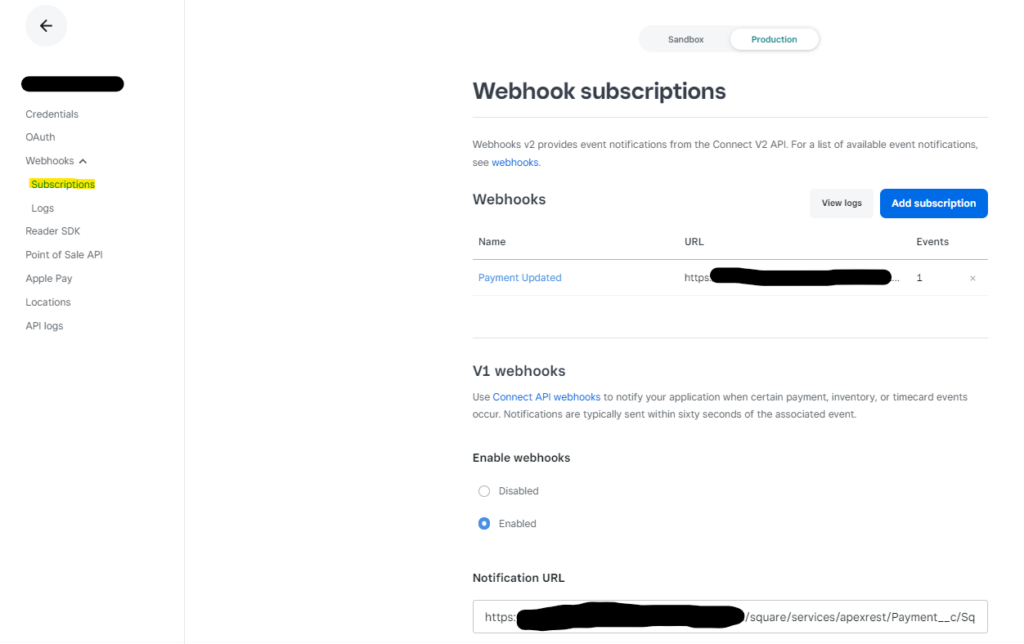
Entering into our Square Developer Account, we will select the Webhooks dropdown menu on the left-hand side.
We will create a Payment Updated webhook by selecting the “Add Subscription” button. The URL will map to our created Site via the @RestResource that we have exposed. The URL should look something like:
https://ORGANIZATION_NAME.secure.force.com/square/services/apexrest/Payment__c/SquarePaymentManager
We will set the webhooks to fire when payment.updated.
Step Ten - Create Square Webhook Subscriptions
Step Ten – Create Square Webhook Subscriptions
Entering into our Square Developer Account, we will select the Webhooks dropdown menu on the left-hand side.
We will create a Payment Updated webhook by selecting the “Add Subscription” button. The URL will map to our created Site via the @RestResource that we have exposed. The URL should look something like:
https://ORGANIZATION_NAME.secure.force.com/square/services/apexrest/Payment__c/SquarePaymentManager
We will set the webhooks to fire when payment.updated.
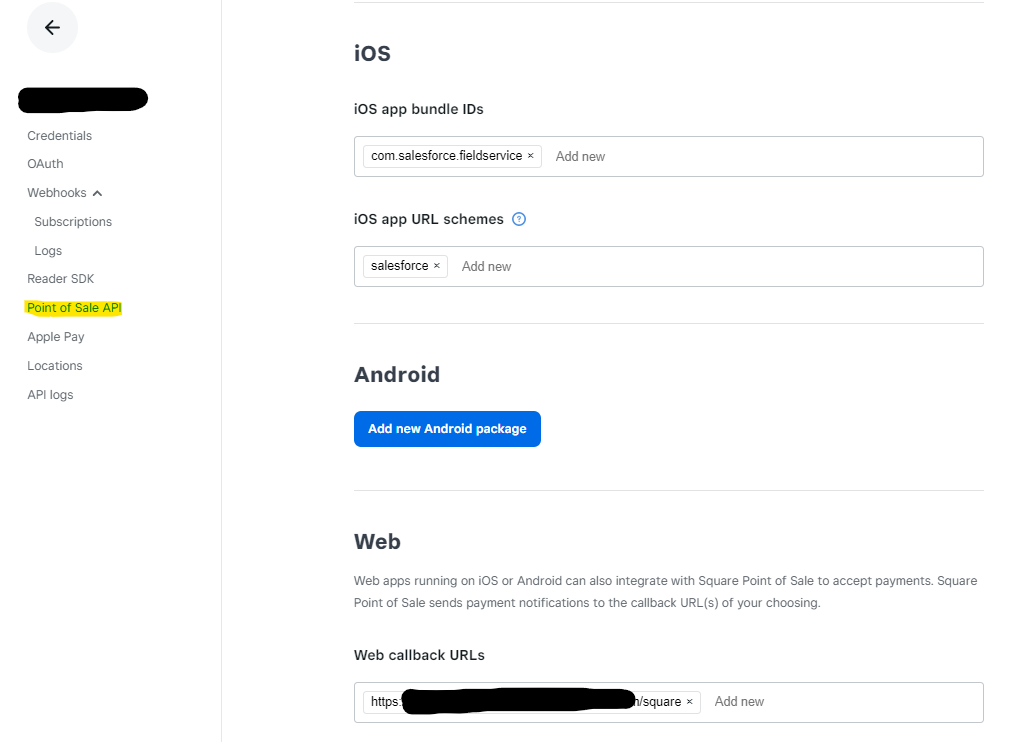
Step Eleven - Set Callback URL
Step Eleven – Set Callback URL
Continuing on in the Square Developer Console, we will set our Web Callback URL. We will select the “Point of Sale API” link on the left-hand side, and add our Force.com site link as our Callback URL. This must match the callback URL that is populated by our trigger handler, which is in the format of www.CALLBACK_URL.com/square.
Step Twelve - Pulling it all together
Step Twelve – Pulling it all together
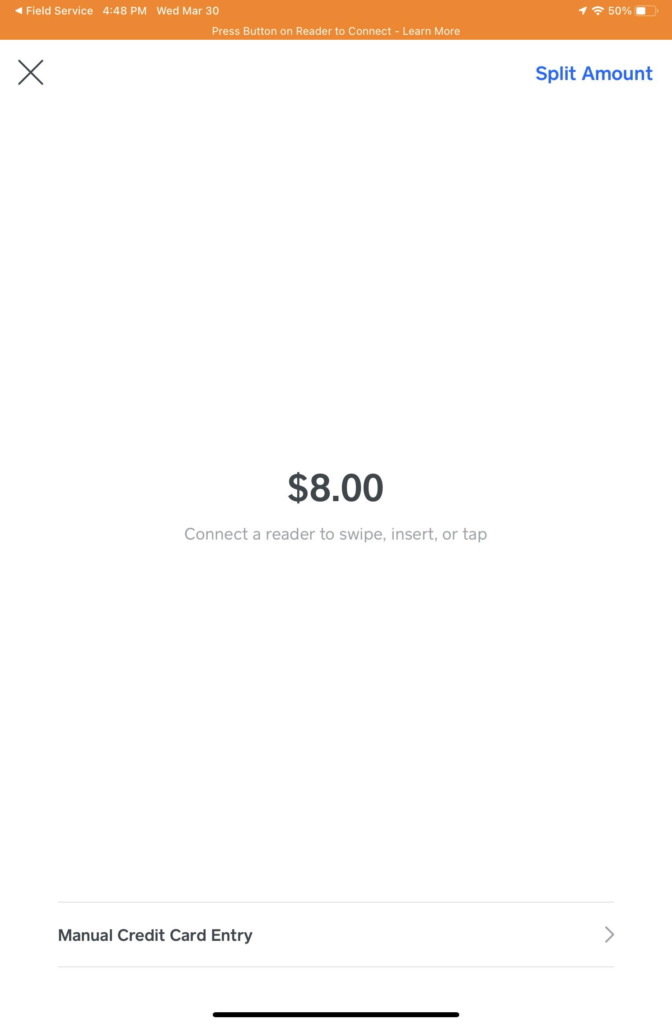
Now that we have completed the functional requirements for generating a Square payment on an iPad, we can test. It is important to note that, as of the writing of this blog post, Square Point of Sale (POS) API only exists in their production instance, so all testing must occur within production in Square, whether you are in a Salesforce Sandbox or a Salesforce Production organization. It is also important to note that because WorkOrder.Launch_Value__c is populated by a trigger, the Field Service Mobile App must be synced after the addition of Work Order Line Items to a Work Order in order to generate the appropriate payment amount.
Conclusion
Field Service Lightning is a powerful tool, and it just got more powerful. We are now able to take Payments in the field and capture them within Salesforce.
If you’re interested in learning more about leveraging Field Service App Extensions to integrate with the popular payment processing application, Square, feel free to reach out to us.

Evelyn Grizzle
Salesforce Developer
Evelyn Grizzle is a data nerd with a burgeoning career in the information technology and services industry. A Database Administrator and Data Analyst turned Salesforce Developer, Evelyn enjoys knitting, roller skating, and automating tasks. Evelyn is certified by Salesforce, CompTIA, Amazon, Microsoft, and Mendix.
About Roycon
We’re an Austin-based Salesforce Consulting Partner, with a passion and belief that the Salesforce platform’s capabilities can help businesses run more efficiently and effectively. Whether you are just getting started with Salesforce or looking to realize its full potential, Roycon specializes in Salesforce Implementations, Salesforce Ongoing Support, and Salesforce Integrations, and Development. We’re the certified partner to guide the way to increase Salesforce Adoption, make strategic decisions, and build your Salesforce Roadmap for success.